บทความ

กำลังแสดงโพสต์จาก สิงหาคม, 2018

งานปฏิบัติ 11

รูปภาพ
งานปฏิบัติ 11 GP2Y Code 1 #include <LiquidCrystal_I2C.h> LiquidCrystal_I2C lcd(0x27,16,2); int aval,temp_aval=0; void setup()  {   lcd.begin();   lcd.setCursor(0,0);   lcd.print("aval = "); } void loop()  {    aval = analogRead(A0);    if (temp_aval != aval)    {       lcd.setCursor(7,0);       lcd.print("    ");    }    lcd.setCursor(7,0);    lcd.print(aval);    temp_aval = aval;    delay(300); } //////////////////////////////////////////////////////////////////////////////////////////////////////////// Code 2 #include <LiquidCrystal_I2C.h> LiquidCrystal_I2C lcd(0x27,16,2); int aval,temp_aval=0; void setup()  {   lcd.begin();   lcd.setCursor(0,0);   lcd.print("aval = "); } void loop()  {   ...

งานปฏิบัติ 10

รูปภาพ
งานปฏิบัติ 10 LDR *Code1 ////////////////////////////////////////////////////////////////////////////////////////////////////////////////////// #include <LiquidCrystal_I2C.h> LiquidCrystal_I2C lcd(0x27,16,2); int aVal=0,tempaVal=0; void setup() {   lcd.begin(); } void loop() {   aVal = analogRead(A0);   if (tempaVal != aVal)   {     lcd.clear();     lcd.setCursor(0,0);     lcd.print("LDR");     lcd.setCursor(0,1);     lcd.print(aVal);     delay(300);   }   tempaVal = aVal; } ///////////////////////////////////////////////////////////////////////////////////////////////////////////////// *Code2   ////////////////////////////////////////////////////////////////////////////////////////////////////////////// #include <LiquidCrystal_I2C.h> LiquidCrystal_I2C lcd(0x27,16,2); int aVal=0,tempaVal=0; void setup() {   lcd.begin(); } void loop() {   aVal = anal...

งานปฏิบัติ 9

รูปภาพ
งานปฏิบัติ 9 keypad & buzzer Code1 //////////////////////////////////////////////////////////////////////////////////////////////////////////////// #include "LedControl.h" #include "Keypad.h" #define C4  262 #define D4  294 #define E4  330 #define F4  349 #define G4  392 #define A4  440 #define B4  494 #define C5  523 char keys[4][4]={   {7,8,9,0},   {4,5,6,0},   {1,2,3,0},   {0,0,0,0}}; byte rowPins[] = {7,6,5,4}; byte colPins[] = {3,2,1,0}; Keypad keypad = Keypad(makeKeymap(keys),rowPins,colPins,4,4); int melody[] = {C4,D4,E4,F4,G4,A4,B4,C5}; int dl = 300; int buzzerpin = 11; LedControl lc=LedControl(8,10,9,1); // Pin 8->DIN, 10->CLK, 9->CS(LOAD), 1 = No.of devices void setup() {   lc.shutdown(0,false);   lc.setIntensity(0,5);   lc.clearDisplay(0);   pinMode(buzzerpin,OUTPUT);   digitalWrite(buzzer...

งานปฏิบัติ 8

รูปภาพ
งานปฏิบัติ 8 7segmant&buzzer Code1 #include "LedControl.h" #define C4  262 #define D4  294 #define E4  330 #define F4  349 #define G4  392 #define A4  440 #define B4  494 #define C5  523 int melody[] = {C4,D4,E4,F4,G4,A4,B4,C5}; float beats[] ={1,1,1,1,1,1,1,1}; int buzzerpin = 11; int timestop = 70; LedControl lc=LedControl(8,10,9,1);  // Pin 8->DIN, 10->CLK, 9->CS(LOAD), 1 = No.of devices void setup()  {   lc.shutdown(0,false);     lc.setIntensity(0,5);    lc.clearDisplay(0);   int dl = 500;   pinMode(buzzerpin,OUTPUT);   int numnote;   numnote = sizeof(melody)/2;     for (int i=0;i<numnote;i++)    {     lc.setChar(0,7-i,'-',false);     tone(buzzerpin, melody[i],dl*beats[i]);     delay(dl*beats[i]);     digitalWrite(buzzerpi...

งานปฏิบัติ 7

รูปภาพ
งานปฏิบัติ 7 เครื่องคิดลข (7 segmant+keypad) ผลCode1คือ: จะแสดงเลขใน 7segmant  เพียง1ตัวเท่านั้น Code 1 #include "LedControl.h" #include "Keypad.h" char keys[4][4]={   {'7','8','9','A'},   {'4','5','6','B'},   {'1','2','3','C'},   {'E','0','F','D'}}; byte rowPins[] = {7,6,5,4}; byte colPins[] = {3,2,1,0}; Keypad keypad = Keypad(makeKeymap(keys),rowPins,colPins,4,4); LedControl lc=LedControl(8,10,9,1); // Pin 8->DIN, 10->CLK, 9->CS(LOAD), 1 = No.of devices void setup() {   lc.shutdown(0,false);   lc.setIntensity(0,5);   lc.clearDisplay(0);     } void loop() {   char key = keypad.getKey();   if (key != NO_KEY)   {     lc.setChar(0,0,key,false);   } } ผลCode2คือ: จะแสดงเลขใน 7segmant  8ตัว Code 2 #include "LedControl.h" #include "...

งานปฏิบัติ 6

รูปภาพ
งานปฏิบัติ 6                  กดสวิตกลับทางมอเตอร์ แสดงจอ LCD                            *Code* #include <LiquidCrystal.h> const int rs = 12, en = 11, d4 = 5, d5 = 4, d6 = 3, d7 = 2; LiquidCrystal lcd(rs, en, d4, d5, d6, d7); int mo1 = 1; int mo2 = 0; int button1 = 7; int button2 = 6; int BS1 = 6; int BS2 = 7; void setup() { pinMode(1, OUTPUT); pinMode(0, OUTPUT); pinMode(13, OUTPUT); pinMode(7, INPUT); pinMode(6, INPUT); lcd.begin(16, 2); } void loop() { BS1 = digitalRead(6); BS2 = digitalRead(7);    if (BS1 == LOW) {    digitalWrite(1, LOW);     digitalWrite(0, HIGH);     delay(10);    lcd.setCursor(7, 1);    lcd.print("RIGHT");    digitalWrite(13, LOW); }   if (BS2 == LOW) {   digitalWrite(1, ...

โฟร์ชาร์ต โปรเจคเปิด/ปิดไฟด้วย Bluetooth

รูปภาพ

โปรเจคสั่งงาน Arduino ผ่าน Bluetooth

รูปภาพ
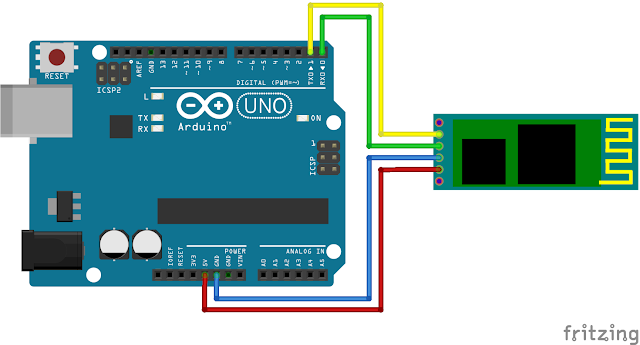
โปรเจค สั่งงาน Arduino ผ่าน Bluetooth  ครั้งที่แล้ว blog เรื่องตั้งค่า HC-05 แต่ไม่ได้บอกว่าเอามาทำอะไร โปรเจคที่ใช้ Bluetooth ส่วนใหญ่จะใช้งานด้านการสื่อสารหรือส่งข้อมูลเป็นหลัก เพราะ HC-05 สามารถทำงานได้ 2 โหมด เป็น Server หรือ Client ได้ เราสามารถประยุกต์ใช้ Bluetooth Module มาเป็นช่องทางในควบคุมอุปกรณ์ระหว่างมือถือกับ Arduino โดยหลักการง่ายๆ ของการใช้ Bluetooth คือต้องมีการ pair อุปกรณ์เข้าหากัน หาก Arduino ของคุณต่อกับ Relay Board คุณก็สามารถสั่งงานผ่าน Mobile App ได้ ก่อนจะถึงการควบคุม Relay มาดูวิธีการสื่อสารแบบง่ายๆ กันก่อน ต่อ Bluetooth Module กับ Arduino ดังภาพ จากนั้นสั่งอัพโหลดโค้ดดังนี้ char BYTE; int LED = 13 ; // LED on pin 13 void setup () { Serial. begin ( 9600 ); pinMode (LED, OUTPUT); } void loop () { Serial. println ( " Press 1 to turn Arduino pin 13 LED ON or 0 to turn it OFF: " ); while (!Serial. available ()); // stay here so long as COM port is empty BYTE = Serial. read (); // read next available b...